Me and my one bathroom house with no linen closet….I have an issue with storage. Situation: I wanted a place to keep my curling irons, girly stuff and cleaning supplies close to the sink. I hated the vanity with the cabinet. You know…the pratical one. And I had to have a pedestal sink…like I have plenty of storage. So I made this storage area for my shampoos and lotions … but it wasn’t enough…


I went through a couple of things.
A Rubbermaid set of drawers that on a good day looked like this. That was before I changed out my sink.

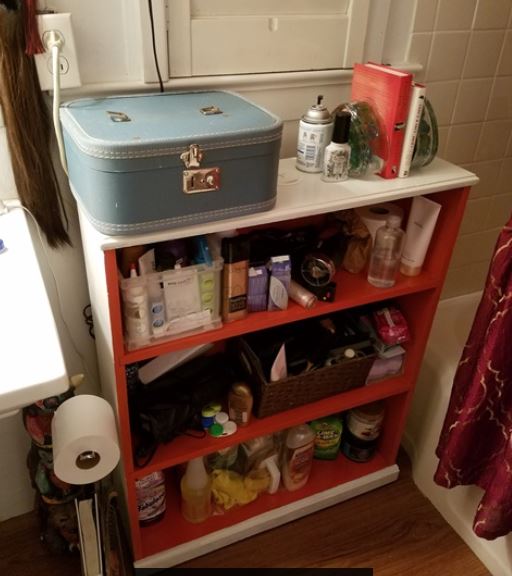
The top was always sinking in if I laid anything on it and because I no longer had room under the sink it was getting crowded. I figured I needed something a little firmer. I headed out to TROSA and found this shelf that looked like this on a good day

I say on a good day because between cleaning lady days it looked like this…don’t judge me… I work a lot of hours. Blame my boss for working me like an Egyptian slave or me for allowing her.

When I sit on the toilet my knees were right there. Something had to give!! Then one day I had a bright idea to get a bookshelf and store my stuff in that!! So off to TROSA I trotted. Immediately what did I spy? A lonely bookshelf…real wood…$15. Yessssss!!


I painted the outside white and the inside a tangerine color.

When it dried I went over the top and inside with a coat of clear satin polyshades. I wanted it to repel water and be easy to clean, just in case I have to do it myself, between the cleaning lady days. As you saw above, I do have those days and uggh I struggle with them LOL. Not that I am dirty…I am just busy as hell. Busy working, traveling and living. Anyway… back to the polyshades… I used a chip brush. It cost 99 cents and you throw it away when finished. I am okay with that. Note that chip brushes from Wal-Mart shed like crazy but the ones from Lowes hardly ever. They cost about a quarter difference. It’s worth it. I keep a dozen of them on hand at all times. When you are painting different colors you need several brushes. Keep that information in your cabinet not pinterest.
I purchased a wireless charger from Ikea for $30. I am always wanting to charge my phone in the bathroom but forgetting to bring the cord in there. I thought this would be handy. It is flat but pops up and has a USB port built-in. NEAT!! I have two phones. I use a Droid Ultra as a camera only…it does not work on the wireless charger for some reason but works on the USB port and I have the Galaxy s7 edge that I use as my phone it works marvelously on the wireless charger…perfect.

It did not come with a template and the cord on the bottom made it difficult to trace the bottom to cut the hole so I used a wood saw hole drill bit. It wasn’t large enough but a good start

After I cut the hole I sat the charger on top and traced it.

After I used my saw I realized I should have traced the inside of the circle that the charger drops in. Well no freaking wonder there was no template…that’s the bad part about Ikea. Their instructions suck. I amended the hole and dropped the charger in. I drilled a hole in the back of the inside of the shelf and threaded the cord through the back and plugged the unit in. Now all I have to do is lay my phone on top of the unit and it begins to charge. I LOVE IT!!.


I put my stuff in it and ugggh I don’t want all my crap on display so I decided to put some doors on. The dimensions of the front is 29.5″w x 33″h
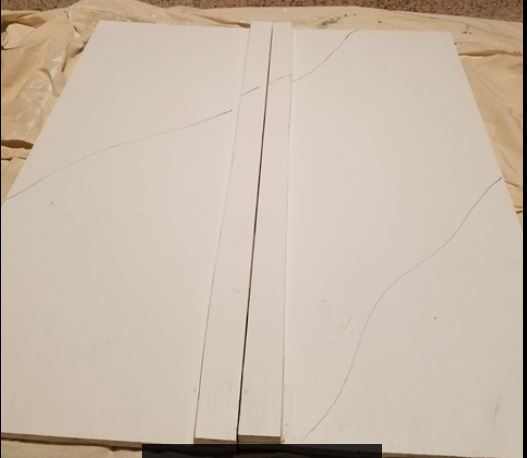
I wrote my list and I needed two pieces of wood 14 3/4″ w x 33″ h for the doors. I was going to have a sheet of wood cut but OF COURSE the night I go to Lowes their saw is out of operation. I think they slap that sign on the machine when they don’t want to cut but whateva. I found two paint grade panels for $7.58 each before my vet discount and they were about the size I needed for each door. I needed two 14 3/4×33 panels for each door and the panels I found were 16×36. They sell different sizes. You can find them in the section where ready made table tops are.


Perfect. If you buy these panels check the wood carefully to make sure the board is not warped and after purchasing it please store it flat .Note that these panels are pre sanded so you can paint with no prep. i don’t even use primer.
You know the rule measure twice cut once right? well I thought that to myself as I was marking off 14 1/4″. I thought there is no way I have this wrong. Welp…I had it wrong. 29.5 divided by 2 is 14 and 3/4 not 14 and 1/4 FUUUUUUUGH

I cut off 2 inches off each side of the original board so I got them out the trash and glued them on top of each side. I used Power Grab but to be honest with you liquid nails would have done the same thing and I feel like I wasted my money. Liquid nails is about $3 cheaper a tube. I say this after using two full tubes and I don’t see the difference. It didn’t “power grab in zero seconds like promised. After a couple of minutes the wood still moved around. A rip off if you ask me I should have taken the empty tubes back and got my money back LOL.


I put a bead of the power grab down the seam like caulk but I was not satisfied that it would hold good. I wanted to pull in that piece of wood real tight. I used my Kreg screws because I love them. They are self tapping screws. This means it drills its own hole and pulls the wood in …it worked as expected.

Next I painted the door white. I knew I was not going to be able to live with this plain white door so I marked off an area to make a two-tone door.
I painted the insert Marsala. Now what? I had no idea. I let it sit on the floor a couple of days looking at me. Speak to me door, speak to me. I decided to do a henna design on it. I went to JoAnns to buy a black paint pen. I found one and I also found a stencil by Plaid from their Home Decor Stencil line and this paint that I love called DecoArt Elegant Finish Metallic Paint in Champagne Gold. I saw some Metallic Gold paint in Lowes I was dying to try but theirs cost about $25. I was not THAT curious. This one cost $6. More palatable!!


The instructions say to tape the stencil on the surface but that is how to make a complete mess. I spray adhesive to the back of my stencils. I tried a dollar store spray for this project and uggh that was a mess. It was a liquid?? I wiped it off and threw the spray away. DON’T BUY DOLLAR STORE SPRAY ADHESIVE!! I don’t know WTF that stuff really is. Spray adhesive it is NOT.

I only brought that because I couldn’t find my real can of spray adhesive but I went home, stopped being lazy and dug for it and finally found it. I use Loctite spray adhesive…general performance…repositionable. I let it sit about 15 minutes to let it dry before using.

I positioned my stencil on my doors and painted away. I used a chip brush and it worked just fine. No bleeding under the stencil and no mess.

Now what? Speak to me door, speak to me. I cut out a page from an adult coloring book and I used a pencil to start drawing the same design…my version…on the door. I used a plate to make a circle, a straight edge to duplicate the lines, free-handed some flowers and leaves and duplicated the design the best I could. I used my black paint pen and gold fabric paint to outline my flower and the lines in the circle.


I cut out the paisley designs placed them randomly on the door and traced them with the pencil.

I traced over the pencil lines with black paint pen
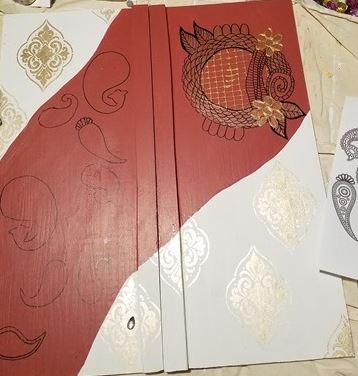
filled in the shapes with gold paint and added some gold circles here and there

Used my black paint pen and gold fabric paint to duplicate patterns from the coloring book inside the paisleys and the circles over the gold paint. Yes this was relaxing. I did this over two days.

I went over the whole thing with a coat of polyshades satin to protect my work. I wanted it to be durable!! Just in case have to clean it LOL. This wasn’t enough for me though. I had to add some bling-bling so I glued on some acrylic jewels, I also used the dimensional paint to add some dots here and there and signed my name.. Now I was satisfied. Okay I admit…maybe I over did it a bit. That’s the Indian in me.


I added some furniture glides under the bottom of the bookshelf so I can slide it without messing up my floor. Now it was time to add my doors back on the bookshelf and turn a shelf into a cabinet. Whoo hooo.I am excited.
*I received a lot of questions about how to add the doors so here is an update on the hinges. I had some left over shutter hinges from my french door project. These hinges have an extra piece making them three pieces.

I put the doors in place then screwed in the hinges on the cabinet side first, then onto the front of the doors and then on the door ends. It was very easy to do.


My phone was dying from taking all the photos so I laid it on the charger and whoop, there it is…charged perfectly…

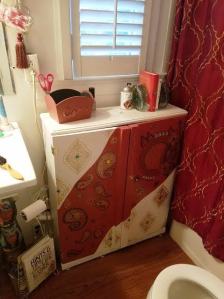
Shall I call this bathroom jewelry?

Because the shelf is not that deep I wanted to make sure it is stable so I added a 2×4 and attached it to the wall and painted it white to match the wall then anchored the shelf into the 2×4 with two 3″ screws. If I move the shelf I have to unscrew the two screws. All of my bookshelves are anchored in the wall. I have young kids visiting and I can’t have them killed by bookshelves.

I went shopping in Marshalls and found these cute knobs


I added the knobs and that was the perfect finishing touch

This was by far not a cheap project:
Bookshelf……………………………………..$15
2 paint sample bottles………………………$ 6
Ikea Jyssen wireless charger……………….$30
wood for doors ……………………………….$14
Plaid Home Decor Stencil (Medallion)…..$ 8
Elmer’s Opaque Marker ……………………$11
Assorted acrylic Jewels ……………………..$10
Elegant Finish Metallic Paint ……………..$6
Tulip Metallics Dimensional Fabric Paint $4
Aleene’s Original Tacky Glue …………….$3
Knobs…………………………………………..$7
====================================
total cost……………………………………..$122
And this is why I argue with the guys in the thrift store over a $15 shelf. It cost me much more in the end.
I have to admit I am shocked over the sticker price….this one escalated out of control…but if I portion out the expenses it wasn’t that bad (I guessssss)…Has that ever happened to you?

Did you have to rough up the cabinet first before painting? I love your idea!
LikeLike
Are you speaking of the bookshelf? No. I just cleaned all the dust off and painted it
LikeLike
Well, the cabinet for your bathroom. Thank you for your response. I have a few things I need to paint as well but didn’t know if I first had to sand them down- not my favorite part.
LikeLike
Almost everyone hates sanding LOL. The panels are paint ready meaning they are already sanded.
LikeLike
The charger def drove the price up. I am using the gold paint and the stencil on my next project, which is really coming out well, and i will use some of the other stuff on other projects as well. Then when you portion out the price it’s not that bad. Buying tools and supplies can kill a budget.
LikeLike
If you take out the cost of the charger then it isn’t so bad. That is just tech convenience.
LikeLike
love, Love, LOVE!!!!!!!!
LikeLike